
Elite PI networking, video encoders and live feeds
An Elite PI system is a small private network. The ENET box in the machine room (an ENETB router on top of a green channel board) talks to the building network on one side and to the displays in the cars on the other. This topic covers the network side: ports, IP addresses, discovery, LEDs, the HDINT video encoder and the live-video feed. Content design questions are covered elsewhere.
How is an Elite PI ENET system connected, and which port does the building data drop go to?
The building’s Ethernet data drop goes to port 1 of the ENETB router (the port labeled “customer network”); everything else on the router is for CE equipment.
How the pieces connect:
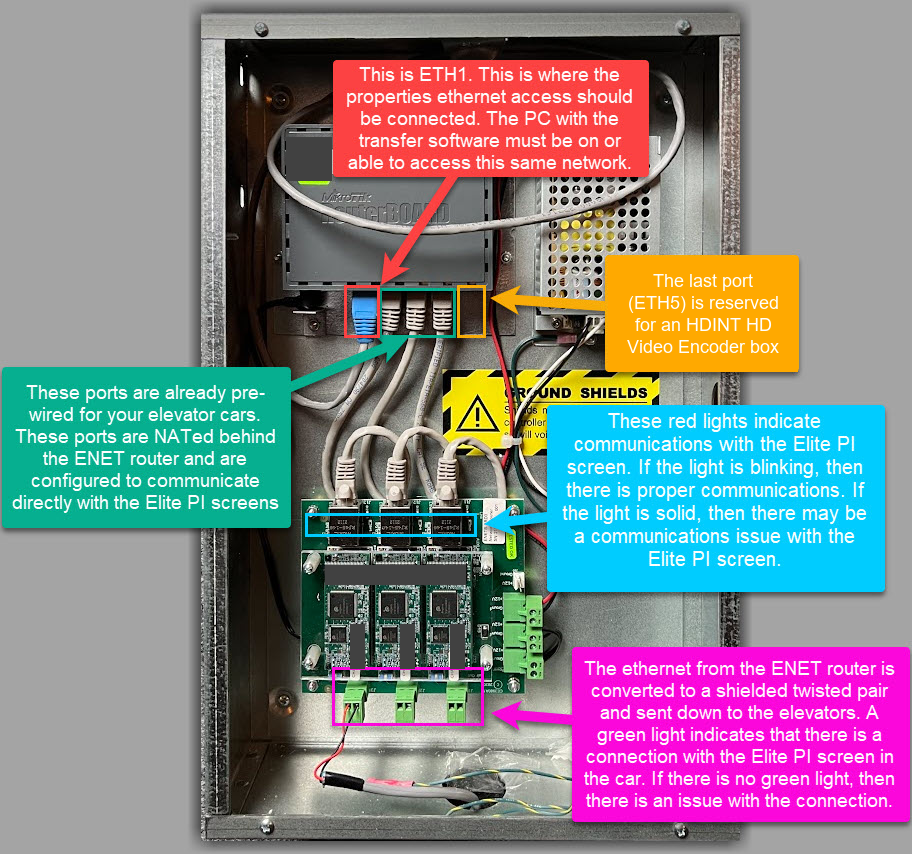
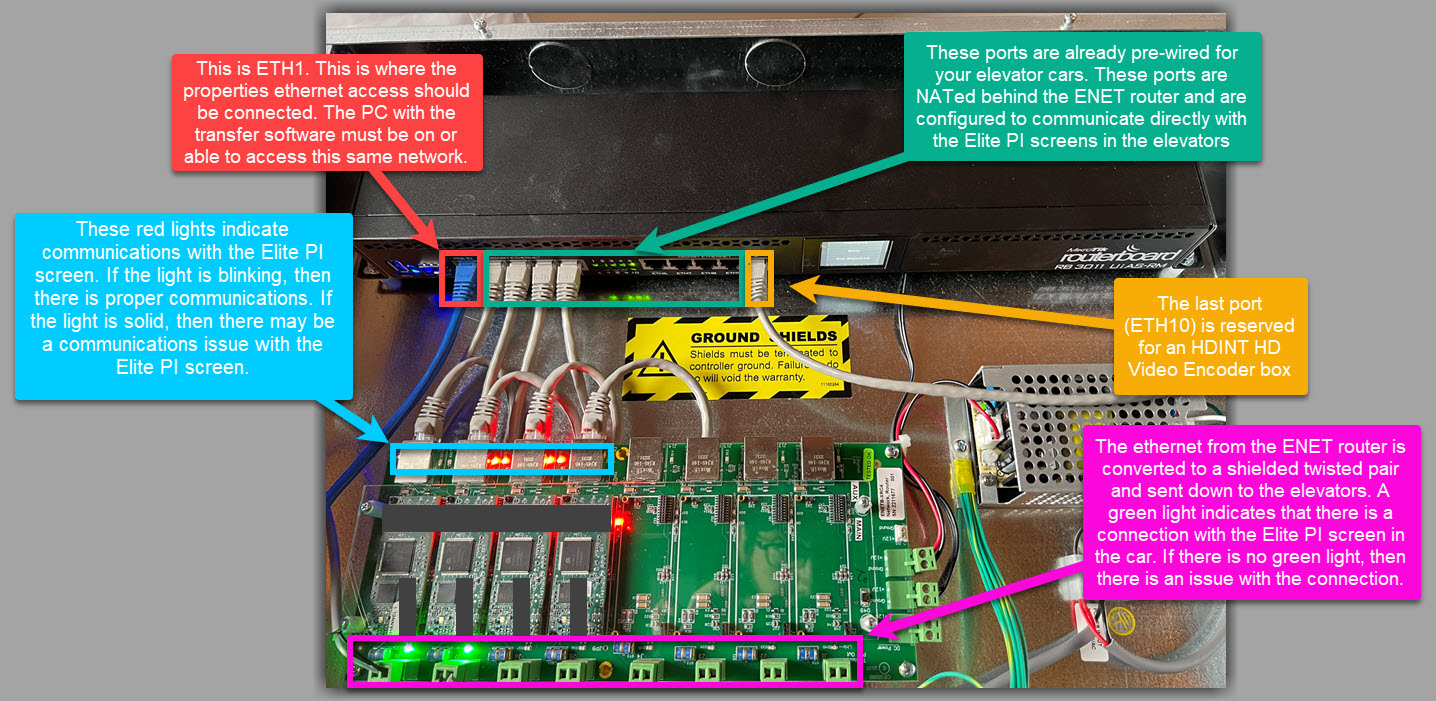
- Port 1 / “customer network” – your local area network. It is pre-configured as a DHCP client, so it takes an IP address from your network. The Windows PC that runs Elite PI Transfer / Designer must be on that same network (same subnet).
- Ports 2–9 (large router) – Ethernet patch cables to the green channel board underneath. The router is NATed: these ports and the displays behind them exist only for CE displays and cannot be reached directly from the building network. Each channel has its own private /24 subnet and the displays are reached by port forwarding. These ports run the ENET’s own DHCP server for the displays, so never land the building drop on one of them – if the building cable is in port 5 instead of port 1, move it to port 1 before continuing with setup.
- Encoder port – the HDINT video encoder, if the site streams live video. On the large router this is the last port, port 10; on the smaller router it is port 5. Follow the label in your cabinet or the site wiring diagram. The encoder’s own “Ethernet” jack is patched to this port with a short jumper.
- Channel board – converts each Ethernet channel to a single shielded twisted pair that runs down the traveler cable. Twisted pairs land on the left-hand terminals (red/white wires); one pair per car (J1, J2, J3 … on the prints).
- LAN converter (small gray box in the car / behind the COP) – converts the twisted pair back to Ethernet, which plugs into the RJ45 jack on the display’s main board. One LAN converter per car per screen.
Everything is local: the system does not need or use the Internet. The two router sizes (large and small) are configured the same way – port 1 is always the customer network.
For a three-channel ENET, the last router port (ETH5) is reserved for the HDINT encoder:
For an eight-channel ENET, the last router port (ETH10) is reserved for the HDINT encoder:
Replacing an older Moxa-based system: take the Ethernet drop that currently lands on the old Moxa board (the cable on the board with the transformer marked “OK”) and move it to port 1 of the ENET. It is already on the right network. The existing twisted shielded pairs to the cars can be reused; the old screens may need a firmware update by flash drive to work with the ENET.
What IP address does the ENET get, and how do I find it?
The ENET is set to DHCP, so its address is whatever your network gives it – CE does not know it in advance, and it can change after a power cycle or generator test unless your IT reserves it.
To find it and connect Transfer:
- On a Windows PC on the same network, open Winbox (free utility from MikroTik, the router manufacturer; it is on the USB stick shipped with the system or can be downloaded). The Neighbors list shows the ENET’s MAC address and IP address. The MAC is also printed on a sticker on the router itself.
- Open Elite PI Transfer, click the second icon at the top left (Edit displays), select the Ethernet tab, then Edit networks → Add, enter the ENET’s IP address and save. Leave the port range alone – it auto-fills (5120–5135).
- Click Rediscover at the bottom left, check the box beside the new network and click OK. The displays populate; press Save.
- A “could not make SSH connection” message at the bottom is normal – Transfer tried every forwarded port and reports the empty ones.
If Transfer suddenly stops seeing any cars (for example when you only wanted to fix the time), the ENET’s IP has probably changed: repeat steps 1–3 with the new address. The same applies after the building changes its Internet provider or router – the ENET and the PC must be moved to the same new network, then re-add the network in Transfer. CE has a YouTube tutorial, “Connecting a PC to the CE Electronics ENET over a network connection”, that walks through this.
Why can’t Winbox or Transfer see the ENET even though it is plugged into the network?
Most often the building drop is on the wrong port, the PC is on a different subnet/VLAN, or a firewall between them is blocking the ports.
Check in this order:
- Right port? The uplink must be in port 1 (“customer network”). Look at the MAC address your switch has learned on that port – it should start with a MikroTik prefix. If the MAC on the switch port belongs to another device (for example a video player), the wrong device is plugged in.
- Same subnet? Winbox discovery and Transfer work on the local LAN. The PC (or the server you remote into) must be on the same subnet as port 1, or your IT must route and allow traffic between the VLANs.
- Firewall ports. If there is a firewall or VLAN policy between the PC and the ENET, allow, between those two networks: TCP 8291 (Winbox), TCP 5120–5135 and 5140–5141 (Transfer to the displays), UDP 5678 and ICMP (ping). All of these are internal – nothing needs to be open to the Internet.
- No DHCP server at all? If the router’s port 1 shows a 169.x.x.x address in Winbox, nobody is handing it an address (typically because a PC is plugged straight into port 1). Either put a small switch/your network between the PC and the ENET, or have IT set a static IP on the PC and ask CE support to set a matching static IP on the router (both on the same subnet).
- Locally with a laptop. If needed, plug a laptop into one of the open display ports or a channel-board patch cable and open Winbox; under IP → Addresses you can see the address of every router port, including the front-facing port 1 address.
Transfer’s Rediscover finds no displays, but Winbox can see the router. What now?
Check the router’s DHCP leases first – that tells you whether the problem is between the cars and the machine room, or between the router and your PC.
- In Winbox open the router, choose IP → DHCP Server → Leases. Every active lease is a display. If all your cars are listed, the cab-to-machine-room side (twisted pairs, LAN converters) is fine.
- If the leases are there but Rediscover finds nothing, Transfer cannot get through on the ports it needs (see the firewall list above), or the PC is directly connected and has a 169.x.x.x address (see above).
- If Transfer shows “SSH network load failed / update failed” after editing networks, close Transfer and reopen it – the background service was not running. It should say “updating status from service” in the corner.
- If a car has no lease, work the channel side: power cycle the channel board, check the channel LED and the LAN converter in that car (next question).
A cab is missing or not discoverable after the router or channel board was replaced. What should I check?
Start by power cycling the green channel board; a new router also means a new IP address, so rediscover it in Transfer as well.
- New router → new IP. Find it with Winbox and update the network in Transfer (see above).
- Power cycle the channel board. Pull its power for about 30 seconds and plug it back in. The channel modules can lock up after a router change and stop handing addresses down to the cars; missing cabs can come back after this (allow a few minutes for the advanced scan to finish). A display that shows a 169.x.x.x address on its info screen instead of a 172.x.x.x address is also a sign that the car is not talking to the machine room – reset the channel board.
- Watch the channel LEDs come back. As the board boots, every channel that has a twisted pair landed should turn green. A channel that stays off or flashes continuously is the one that is not communicating with its cab (twisted pair or LAN converter).
- Channels are numbered, cars are lettered. The ENET works in Group 1 / Channel 1, 2, 3 …; the site usually labels cars A, B, C … Make sure the mapping is one-to-one (A=1, B=2 …) and that the patch cables from the router to the channel board have not been moved – an offset by one port makes the “wrong” car disappear.
- LAN converters are mated to their channel. A Group 1 Channel 1 converter will not work on Channel 3. Do not swap converters between cars to test.
- Still one car missing? Check the LAN converter and the display’s RJ45 link light in that car (next question). If the RJ45 jack on the channel board and the matching router port were both damaged, something is coming up the traveler cable: check that the shields are grounded and have the elevator contractor check the traveler pairs (for example, a reading of 6.8 Ω across a pair, even on spares). If channels keep dropping in and out on several cabs while nobody touches anything, the channel board itself is suspect and needs replacement.
Verify with CE support.
What do the LEDs on the channel board, LAN converter and display tell me?
Green on the channel side means the cab is talking; blinking red on the other side indicates communication; a LAN converter with no red light means the display is not linked.
| Where | LED | Normal | If not |
|---|---|---|---|
| Channel board, twisted-pair side (left when mounted upright) | one per channel | green for every channel with a car connected | off/flashing → that car is not communicating (twisted pair, LAN converter) – power cycle the board, check the pair |
| Channel board, other side (right) | row of LEDs | red blinking indicates communication | solid red may indicate a communication issue with the display |
| LAN converter in the car | green + red in the bottom corner | both lit | green only (no red) → no link to the display’s RJ45 jack – swap the patch cable; if still no link light on the display’s main board, the board’s RJ45 jack is damaged and the board must go in for repair |
| LAN converter, yellow LED by the power plug | solid, with a blinking LED opposite the plug | negotiating/linked | – |
| Display main board, next to the screen connector | two solid red + blinking blue | processor running | – |
A board that was “mounted sideways” confuses people: look at where the twisted pairs land – that is the side that should be green. If only one pair is landed, only one car will ever show up.
Display info screen: turn on DIP switch S1-1 on the display to show the information screen. At the bottom it lists MAC, IP address and mask. A blank IP means the display is not getting an address from the machine room (not a bad display by itself). The top shows the product and ECM support version.
Can I use an Ethernet splitter to put a second screen in the same car on the network?
CE recommends a second LAN converter for the second display, not an Ethernet splitter.
- One LAN converter serves one car and one screen; the LAN converters are mated to a channel of the channel board.
- A second display in the same car can get its own LAN converter run over the same twisted pair; the channel module upstairs can serve several LAN converters (five or six).
- A LAN converter that is mounted on and powered from one screen but wired to the other screen is an unusual arrangement – keep each converter with the screen it serves.
Verify with CE support.
How do I connect the HDINT video encoder and the HDMI source for live video?
The HDMI source plugs into the HDINT encoder in the machine room, the encoder’s “Ethernet” jack is patched to the router’s encoder port, and each display must have the streaming design loaded so it knows to look at the encoder.
- One encoder per elevator bank. It lives in the machine room with the ENET and feeds video to all cars on that ENET. Each bank needs its own HDMI feed.
- Encoder Ethernet → short jumper to the ENET router’s encoder port (port 10 on the large router; port 5 on the smaller router – the cabinet label says “HDINT video encoder”). If the building cable is in this port and the encoder is left unplugged, there is no video anywhere.
- HDMI in → your source. Use a digital signage player (for example BrightSign, Populo, Captivate) or a media player. A PC or laptop is not recommended – its graphics output is higher than the encoder handles and the picture is choppy. The HDMI input is optional: if you only show flyers and scheduled messages, leave it unconnected.
- Load the streaming design on each display. The display will not stream until its design contains the live-video window pointing at the encoder. CE sends a
USBInstaller.zipfile: copy it to a USB stick exactly as received (do not unzip it; the name must stay exactlyUSBInstaller.zip), plug the stick into the USB port on the back of each display (in every car – the machine room does not push this), wait for “now uploading new graphics … finished, please remove USB”. A display that shows a plain blue background with just the floor number is still running the generic graphics and needs this streaming design from CE. - Audio. If the feed includes sound, flip the audio DIP switch on the back of the display and connect an 8 Ω speaker to the audio output.
Can I plug the HDMI source straight into the display, or use the encoder’s HDMI output?
No. Video has to go through the HDINT encoder; the HDMI output on the HDINT-4 is pass-through only.
- Source → HDMI → encoder → Ethernet → ENET → channel board → twisted pair → LAN converter → display. Plugging a source directly into the display does not work, and an older encoder that the source is not compatible with will not help either.
- The HDMI port J25 on the display CPU is the CPU’s output to the LCD panel (check the wiring diagram for your board revision). It is not an input.
Screens go black or show a split picture when the venue’s video source is connected, but a laptop works. Why?
The source is HDMI 2.0 and the HDINT-3 encoder only accepts HDMI 1.4.
- A 2.0 receiver can accept a 1.4 signal, but a 1.4 receiver (HDINT-3) cannot sync to a 2.0 source. TVs and laptops work because their graphics chips negotiate down; the venue’s professional source did not.
- The fix is the HDINT-4 (4K, HDMI 2.0) encoder. CE no longer ships HDINT-3. Replacement HDINT-4 units ship on the mounting plate so you can unbolt the old plate inside the existing box and bolt the new one in; existing boxes and conduit stay.
- Typical symptom: the video plays correctly from a laptop (choppy but full resolution) while the professional source gives a black or split screen.
The display says “Check video encoder – URL = rtsp://ENCODER-IP/0”. What does it mean?
The display cannot reach the encoder at its RTSP address; if the rest of the screen is black, the display is not talking to the machine room at all.
- Black behind the message → the car is not connected to the ENET. Check the display’s info screen (DIP S1-1) for a blank IP, the LAN converter LEDs and the display’s RJ45 link light, then the channel LED and twisted pair for that car (see LED question). A LAN converter with only a green light and no link light on the main board points to the board’s RJ45 jack.
- Graphics show but the video window is black → the encoder side: encoder powered, its Ethernet jumper in the router’s encoder port, HDMI source connected, and the ENET router/encoder power cycled if the encoder keeps restarting.
- Screens freeze with this message every few weeks and need a power cycle → older display software. CE provides an update file that you load by USB stick into each display, the same way as a design update (for example ECM support version 1.8.0.24).
- Have the display serial number and encoder serial number ready when you call CE – they identify the job.
I still have an old Moxa serial-to-Ethernet board. How do I get it back on the network?
Older Elite PI systems used a board in the machine room with a Moxa piggyback module (serial over Ethernet at 9600–19,200 bps). Check its link LEDs, then its IP address; if the IP is unknown, factory-reset the module.
- LEDs by the Ethernet jack: the red Ready LED should be lit and the yellow 100M LED should blink constantly. Ready on but 100M not blinking = no network link → test or replace the cable, try another switch port, or reset/replace the switch or router in between (this often fixes it). In Transfer this shows up as “insufficient time to complete request” / cannot talk to the machine room board.
- Ports used by the Moxa Network Enabler software: TCP 950, TCP 966 and UDP 4800 on the local network. Each wing/bank has its own virtual COM port on the PC (e.g. COM 12–15); make sure the port you open belongs to the display you cannot reach – duplicate COM entries are a common source of confusion.
- Cannot ping it, IP unknown? Factory default is 192.168.127.254. If someone changed it and nobody knows the address, or another device (for example a NAS) has taken the same IP, reset it:
- On the Moxa piggyback board (barcode label with the MAC) find the two jumper pins or solder pads marked JP1/JP2.
- Short them (paper clip) and hold: the red Ready LED blinks three times slowly, three times fast, then all LEDs flash and go out.
- Remove the short; when Ready lights again the module is at 192.168.127.254.
- Connect a laptop with a crossover cable on that subnet, open the address in a browser (web console) and set the IP/mask your network needs. Then CE support can configure the Transfer connection.
- If the PC shows two network connections, make sure the one used for the elevator board is on the same subnet as the board; being on a different subnet or VLAN is why the device answers the gateway but not the PC.
- This hardware is obsolete and parts are no longer available. The upgrade is an ENETB router with Ethernet extender channels, reusing one of the existing twisted shielded pairs per car, a LAN converter at the screen and a firmware update of the existing screens by flash drive; it runs at 100 Mbit/s and uses the same Transfer software.
Still have a question? Ask Elevate AI