
ENET router setup with WinBox and Elite PI Transfer
The ENET is the MikroTik router in the elevator machine room that connects your building network to the Elite PI screens. These guides walk through the everyday setup and troubleshooting tasks with screenshots. For how the ENET is wired, the firewall ports and LED meanings, see Elite PI networking, video encoders and live feeds.
What is WinBox, and where do I get it?
WinBox is MikroTik’s free Windows program for looking at and configuring the ENET router. You use it to find the ENET’s IP address, see which screens are connected, and run CE’s setup scripts.
- Check whether it is already installed: type WinBox in the Windows search bar. It is often installed when the ENET is first set up.
- If it is not there, download it from MikroTik’s WinBox page. Most PCs need the 64-bit Windows version.
- Open WinBox. No installation is needed beyond saving the program.
If WinBox asks for a router password that you do not have, contact CE support. Do not change the ENET login or password: if it is changed and not recorded, the router has to be returned to CE for a factory reset.
How do I find the ENET’s IP address with WinBox?
Open WinBox on a PC that is on the same network as the ENET and look at the Neighbors tab. It lists every ENET the PC can see, with its IP address.
- Open WinBox.
- Select the Neighbors tab if it is not already open, and click Refresh if the list is empty.
- Find the row whose Identity starts with Enet. The IP Address column is the ENET’s address on your network. Your address will be different from the example.
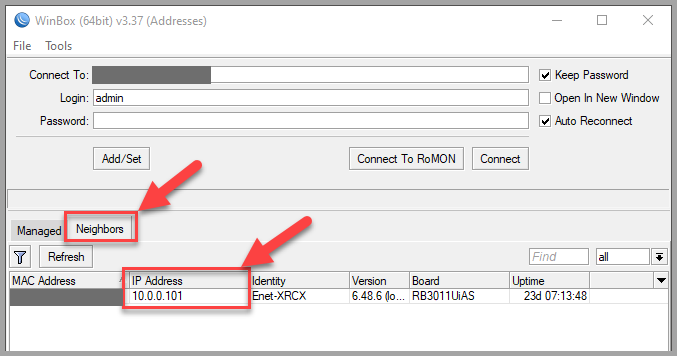
What the result means:
- Nothing listed: the PC cannot see the ENET. It is most likely on a different network or VLAN, or your IT department’s network restrictions block it. Ask IT to give the PC access to the network that the ENET’s port 1 is connected to.
- The ENET is listed with 0.0.0.0: the network does not hand out addresses automatically (DHCP is turned off), so the ENET has no address. The ENET needs a static IP address. See How do I give the ENET a static IP address?
How do I check that my PC is on the same network as the ENET?
Compare the ENET’s address with your PC’s default gateway, then ping the ENET. Elite PI Transfer can only reach the screens if the PC and the ENET are on the same network (or IT has routed the two networks together and opened the ports).
-
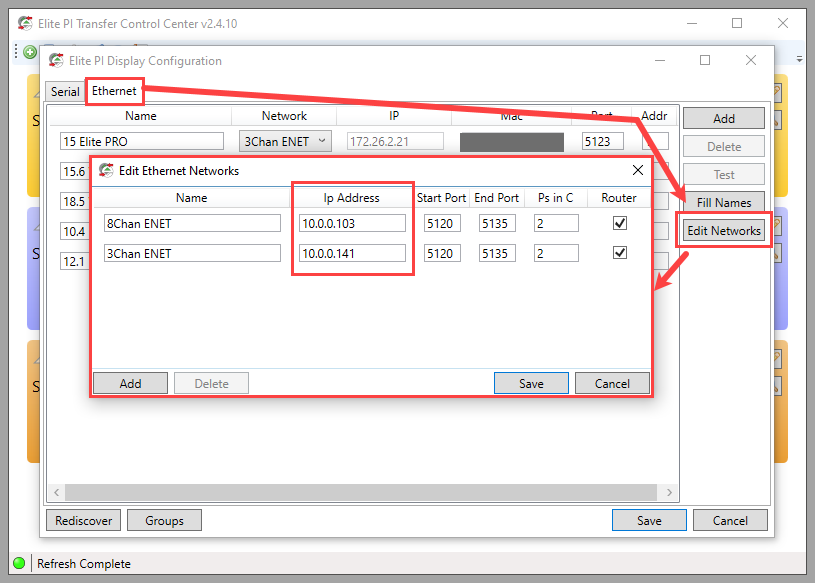
Find the ENET address that Transfer is using. In Elite PI Transfer click Edit Displays, open the Ethernet tab and click Edit Networks. Note the Ip Address of each ENET, then click Cancel. This is the address from when the ENET was last set up; if it may have changed, check it in WinBox (previous question).
-
Find your PC’s gateway. Type CMD in the Windows search bar to open a Command Prompt, type
ipconfigand press Enter. Under your Ethernet adapter, note the Default Gateway.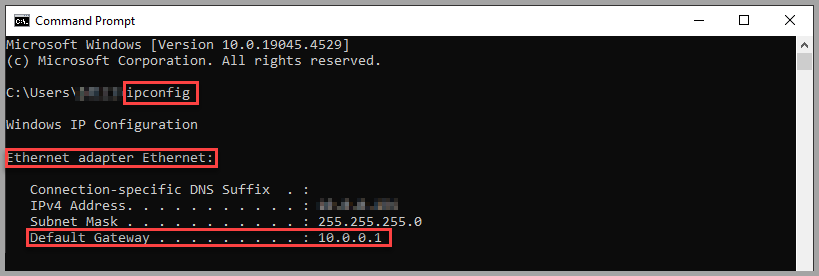
-
Compare them. On a typical office network the first three numbers should match. For example, a gateway of 10.0.0.1 and an ENET at 10.0.0.103 are on the same network. If they do not match, ask your IT department for access to the ENET’s network.
-
Ping the ENET. In the same Command Prompt type
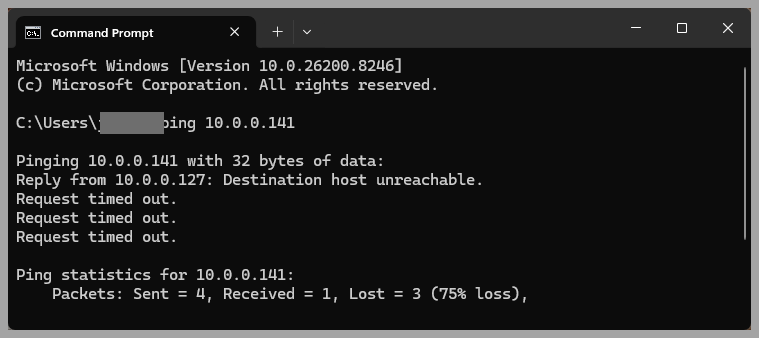
pingfollowed by a space and the ENET’s address, for exampleping 10.0.0.145, and press Enter. Replies mean the PC can reach the ENET: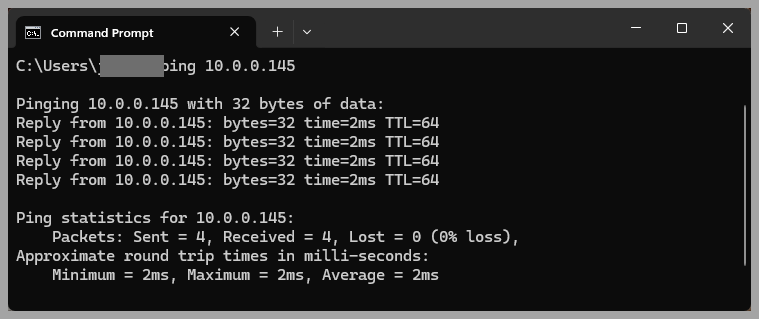
“Request timed out” or “Destination host unreachable” means it cannot, so contact your IT department:
WinBox can’t see the ENET. How do I find its IP address at the router?
Connect a laptop directly to an open port on the ENET, open WinBox, and read the port 1 address under IP → Addresses.
-
Check port 1 first. The building network cable must be plugged into the ENET’s first Ethernet port. If nothing is plugged in there, the ENET is not connected to the building network. Stop here and ask the property’s IT department to make that connection.
-
Plug the laptop into an open port on the ENET router with an Ethernet cable. If no port is free, you may temporarily unplug the last port. Never unplug the building network cable in port 1.
-
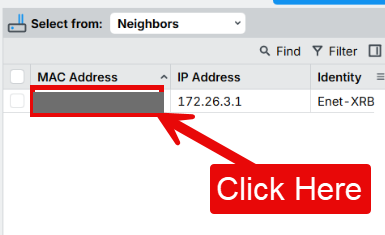
Connect with WinBox. Open WinBox; the ENET appears in the Neighbors list. Click its MAC address to connect by MAC, then click Connect.
-
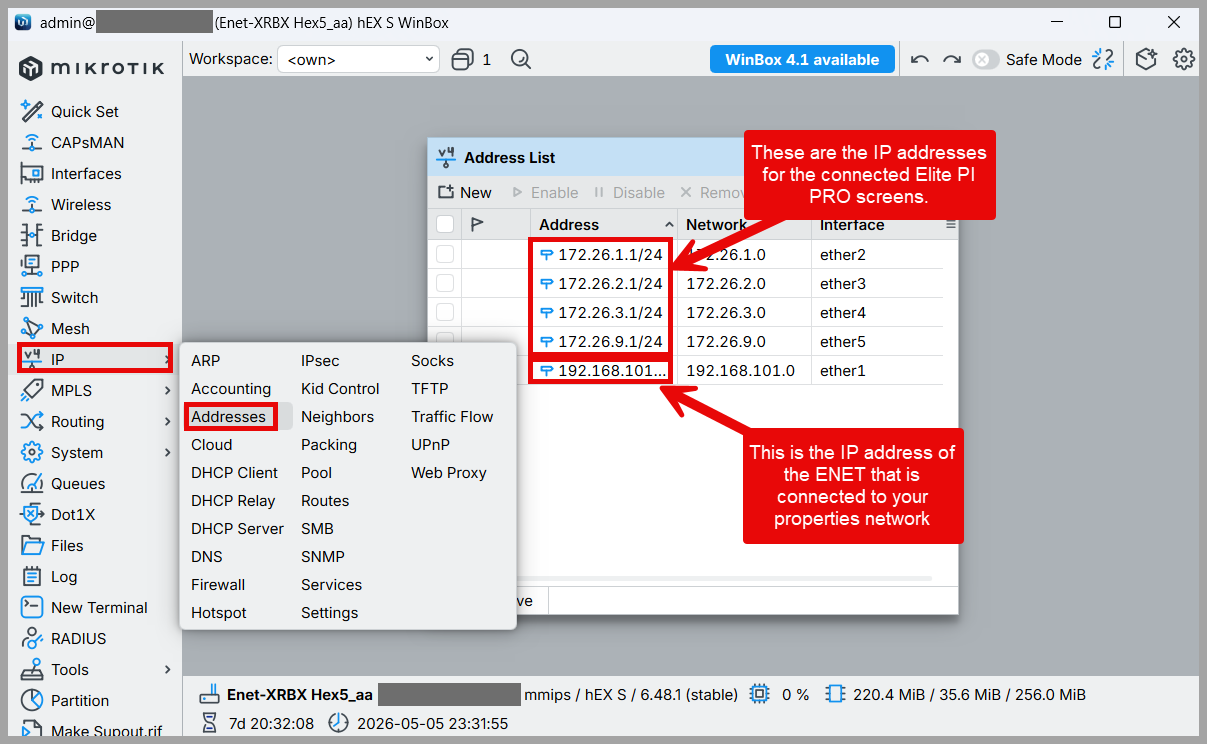
Read the addresses. In the left menu choose IP → Addresses. The 172.26.x.1 addresses are the display channels. The ether1 line is the address the ENET received from your building network. Drag the column wider if the address is cut off.
-
Note the ether1 address, disconnect the laptop, and plug back in anything you unplugged.
-
From the PC that will run Transfer, ping that address as described in How do I check that my PC is on the same network as the ENET?
If ether1 shows 0.0.0.0 (or no address), the network is blocking the ENET or does not use DHCP. Ask IT either to allow a DHCP address for the ENET or to give you a static address to set with the scripts below.
How do I see which Elite PI screens are connected to the ENET?
In WinBox, connect to the ENET and open IP → DHCP Server → Leases. Each line is an Elite PI screen that the ENET has given an address to.
- Open WinBox, select the ENET in the Neighbors tab and click Connect. If no ENET is listed, see the previous questions.
- Click IP in the left menu, then DHCP Server.
- Open the Leases tab.
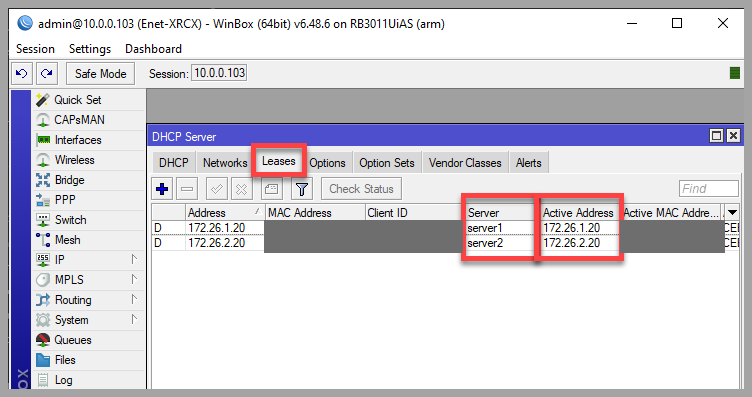
How to read it:
- A car is missing (for example, four cars but only three leases): that screen is not communicating with the ENET. An elevator technician needs to check the wiring to the screen and the LAN converter in that cab.
- The same server appears twice (for example server1, server2, server3, server3): two channels are cross-communicating. Have the elevator technician contact CE support.
- Which car is which: the ENET hands out addresses by channel. 172.26.1.20 and 172.26.1.21 are on channel 1, 172.26.2.20 and 172.26.2.21 on channel 2, and so on. Have the elevator technician record which car is wired to which channel. If car B is on channel 2, an Active Address of 172.26.2.21 is car B.
Which IP addresses and ports does each ENET channel use?
Each display channel has two addresses on its own 172.26.x subnet, reached through its own port on the ENET. The HDINT video encoder uses ports 5140 and 5141.
| Port | Display address | Used for |
|---|---|---|
| 5120 / 5121 | 172.26.1.20 / .21 | ENET channel 1 |
| 5122 / 5123 | 172.26.2.20 / .21 | ENET channel 2 |
| 5124 / 5125 | 172.26.3.20 / .21 | ENET channel 3 |
| 5126 / 5127 | 172.26.4.20 / .21 | ENET channel 4 |
| 5128 / 5129 | 172.26.5.20 / .21 | ENET channel 5 |
| 5130 / 5131 | 172.26.6.20 / .21 | ENET channel 6 |
| 5132 / 5133 | 172.26.7.20 / .21 | ENET channel 7 |
| 5134 / 5135 | 172.26.8.20 / .21 | ENET channel 8 |
| 5140 / 5141 | 172.26.9.20 / .21 | HDINT video encoder |
Your IT department must allow traffic between the PC and the ENET on ports 5120–5141 and port 8291 (WinBox). The complete firewall list is in Why can’t Winbox or Transfer see the ENET even though it is plugged into the network?
How do I give the ENET a static IP address?
Upload CE’s setstatic.rsc script to the router with WinBox, then run import setstatic.rsc in a WinBox terminal and enter the IP address, subnet mask and gateway from your IT department. The ENET normally gets its address automatically (DHCP), so only do this when IT asks for a fixed address or the network has no DHCP.
Download the script: setstatic.rsc. Keep the file name exactly as it is.
-
Connect to the ENET with WinBox.
-
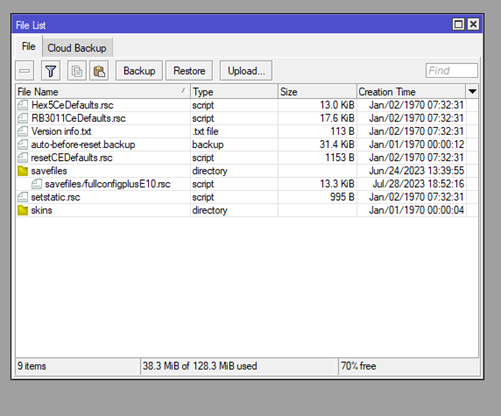
Click Files in the left menu to open the File List. Drag the script into the list, or click Upload… and select it.
-
Where to put the file depends on the router:
-
10-port router (RB3011): the main file area is fine.
-
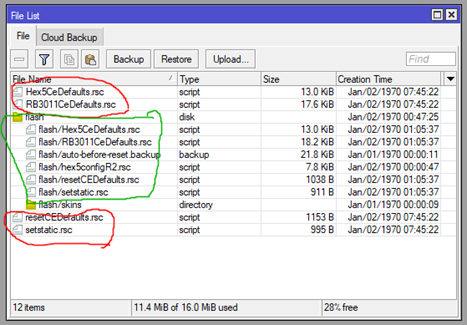
5-port router (hEX S): the file must go in the flash folder. Files outside flash are on a RAM drive and are lost when the router restarts. The files circled in green below will work; the ones circled in red will not.
-
-
Click New Terminal.
-
Type
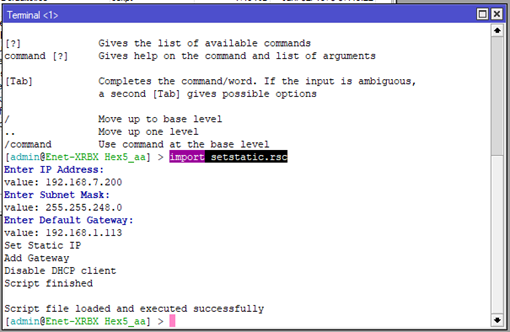
import setstatic.rscand press Enter. On a 5-port router, typeimport flash/setstatic.rsc. Tab completion works: typeimp, press Tab, typeset, press Tab, then press Enter. -
Answer the three prompts, pressing Enter after each: the IP address, the subnet mask and the default gateway.
-
Wait for “Script finished”. Port 1 (ether1, the building network port) now has the static address and no longer uses DHCP.
Update the ENET’s address in Elite PI Transfer afterward (see My ENET’s IP address changed. How do I update Elite PI Transfer?).
How do I put an ENET router back to CE’s default settings?
On a 10-port (RB3011) ENET, upload resetCEDefaults.rsc and RB3011CeDefaults.rsc, then run import resetCEDefaults.rsc in a WinBox terminal and answer y. This returns the router to how it shipped: port 1 uses DHCP again and WinBox can connect. Any static IP address is removed.
Download both files and keep their names exactly as they are. The reset script looks for the second file by name.
- Connect to the ENET with WinBox, open Files and upload both files (see the previous question).
- Click New Terminal, type
import resetCEDefaults.rscand press Enter. - The script checks the router model and that the matching file is present. If the checks pass, it asks whether to reset. Press y.
- Wait up to 50 seconds for the reset to finish, then reconnect with WinBox.
For a 5-port (hEX S) ENET, contact CE support for the reset. Its defaults are not published here, and the script stops with “missing … script” rather than resetting it.
My ENET’s IP address changed. How do I update Elite PI Transfer?
Enter the new address under Edit Networks, delete that ENET’s screens, rediscover them, and add them back to your tasks. This usually happens after a power outage or a network-wide restart, because the ENET takes whatever address the network gives it (DHCP).
-
Find the new address with WinBox (see How do I find the ENET’s IP address with WinBox?).
-
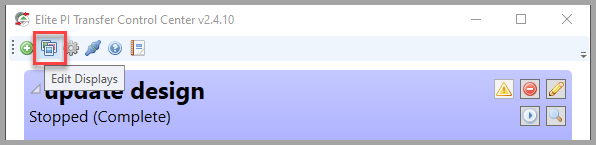
In Elite PI Transfer click Edit Displays.
-
On the Ethernet tab click Edit Networks. Change the Ip Address of each ENET whose address changed and click Save. If the addresses already match WinBox, the problem is something else. Contact CE support.
-
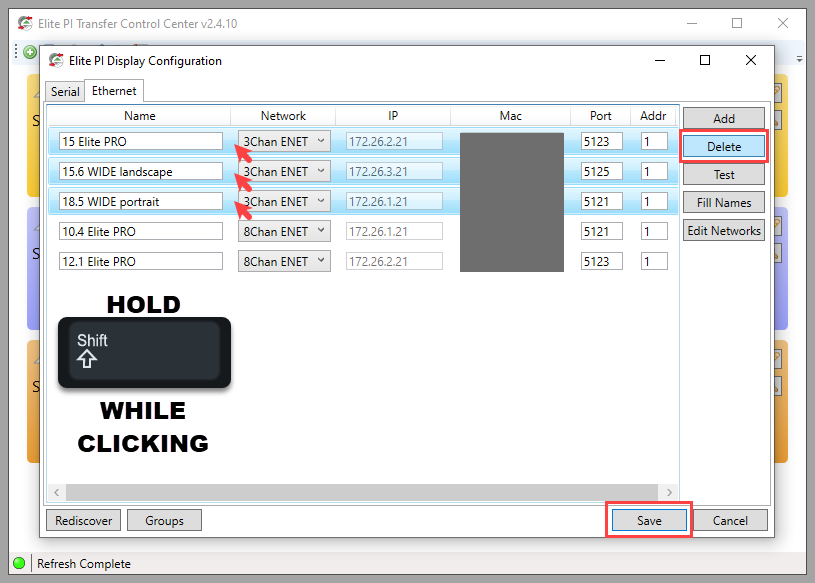
Delete the old screens. In the Elite PI Display Configuration window, hold Shift and click to select every screen on that ENET (they turn light blue). Click Delete, then Save.
-
Rediscover them, name them and add them back to your tasks. Follow the steps in the next question.
How do I rediscover an Elite PI screen in Transfer, for example after it was repaired?
In Elite PI Transfer click Edit Displays, then Rediscover. Check the network and click OK. Name the screens it finds, save, and add them back to your tasks.
-
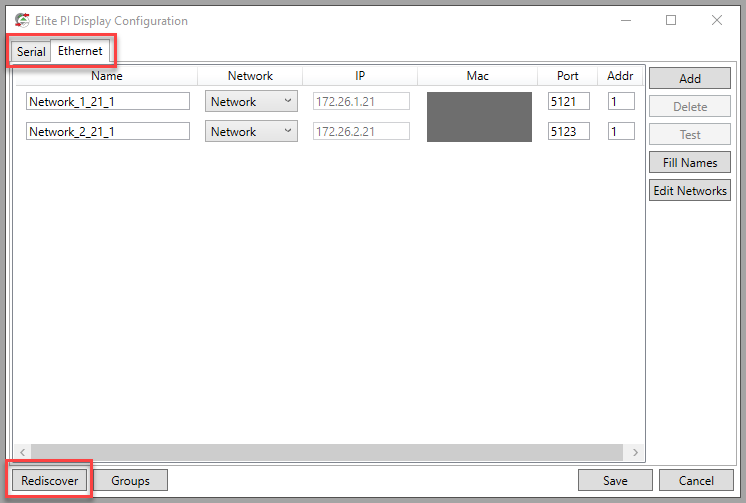
Click Edit Displays. Your screens are on either the Serial or the Ethernet tab, depending on your hardware. If no elevators are listed at all, Transfer has not been set up for your network yet. See What IP address does the ENET get, and how do I find it? and CE’s YouTube tutorial on connecting a PC to the ENET.
-
Click Rediscover at the lower left.
-
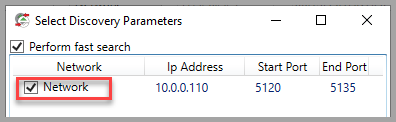
Check the network (bank of elevators) to search and click OK. If you are not sure which one has the missing screen, check them all.
-
Transfer searches the ENET and highlights each screen it finds in green.
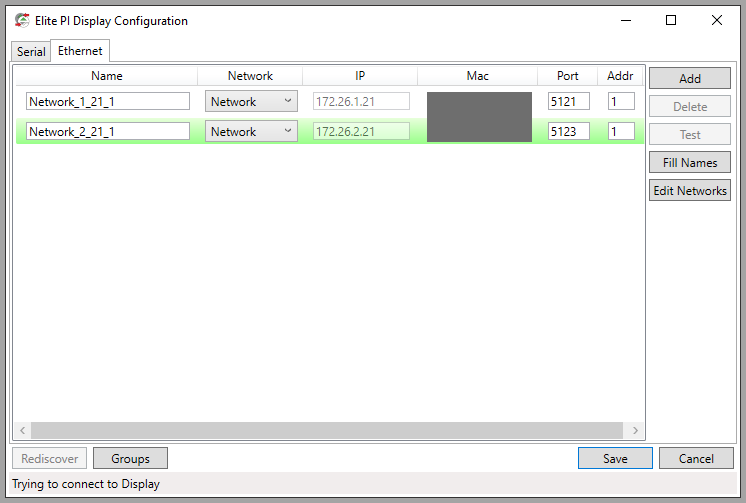
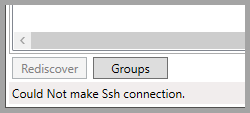
If it finds nothing new, “Could Not make Ssh connection” appears at the bottom. Close and reopen Transfer and try again. If it still finds nothing, contact CE support.
-
Type a name for each screen (for example Car 1) and click Save.
-
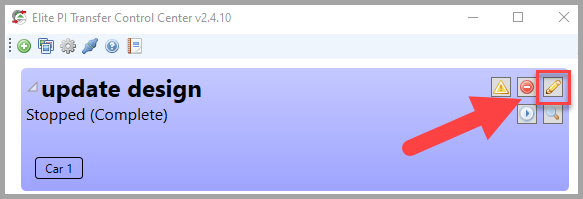
Add the screens back to your transfer tasks. On the task that should include the car, click the Edit (pencil) button.
-
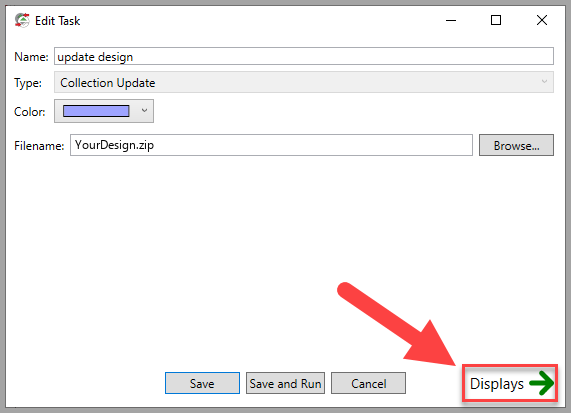
Click Displays.
-
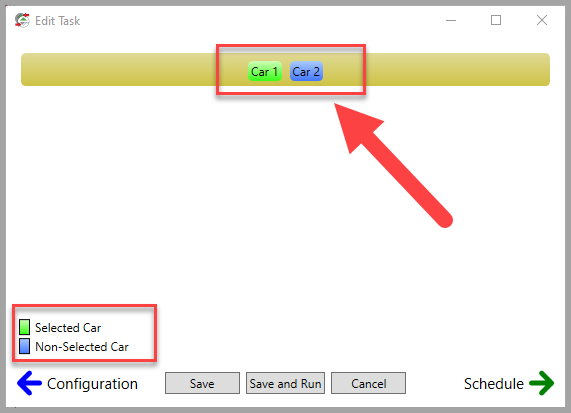
Click each car that should receive the task so it turns green (selected), then click Save, or Save and Run to send the content now.
How do I test an ELBNK serial networking unit’s connection to the Elite PI screens?
Turn on DIP switch 1 of S1 on the ELBNK, select the channel with S5, and read the two-digit display. D1 alternating with OK means the channel is connected. The ELBNK is a discontinued serial networking unit (2-channel duplex or 8-channel); the test is the same on both.
Watch the ELBNK transmit and receive test video.
The ELBNK must already be wired to the Elite PI screens with shielded, twisted-pair wire, with the shields grounded:
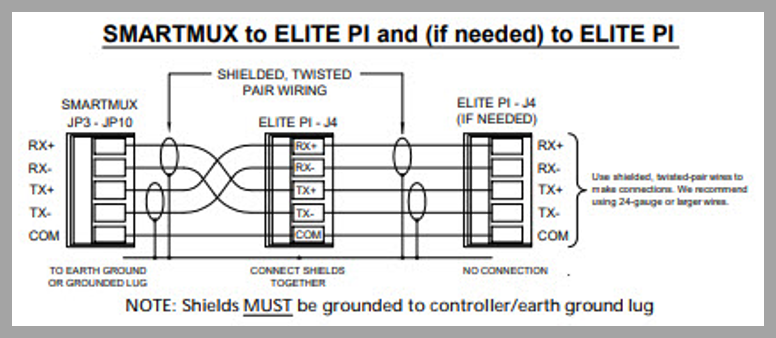
-
Set S1 DIP switch 1 (TEST1) to ON.
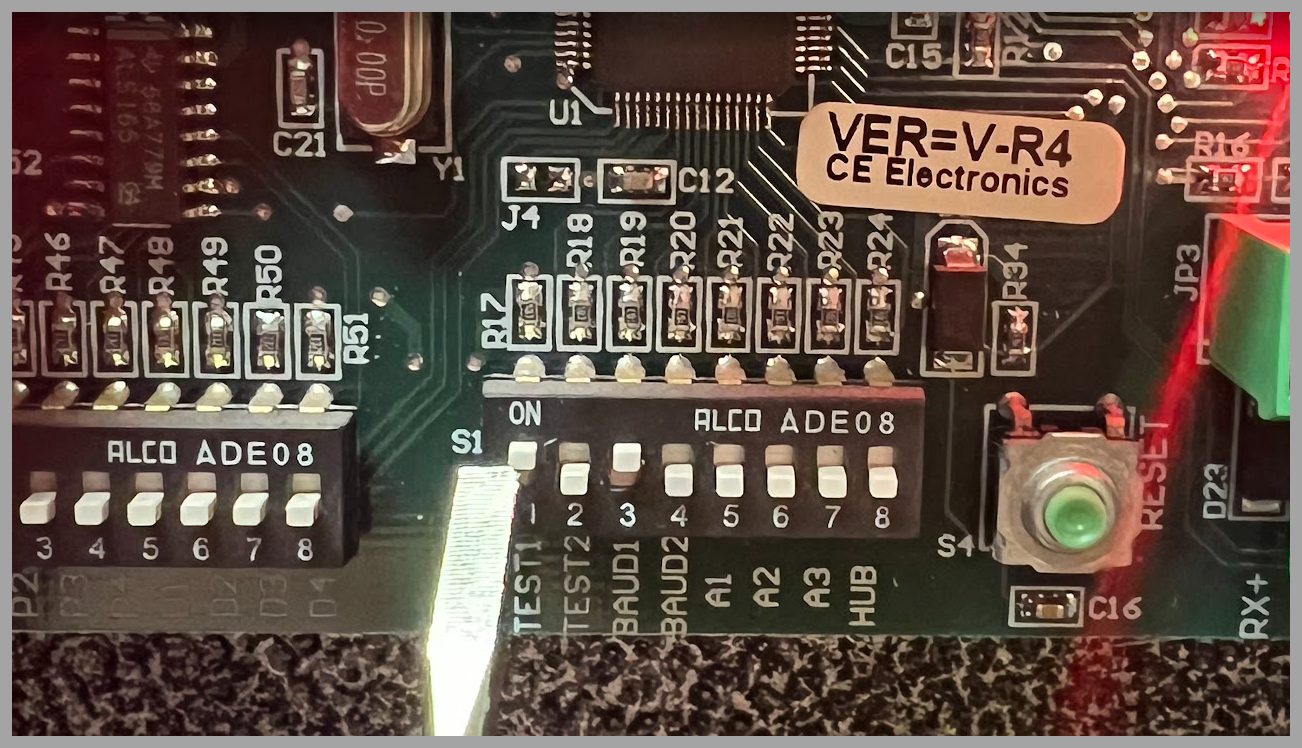
-
Set the S5 DIP switches for the channel you want to test:
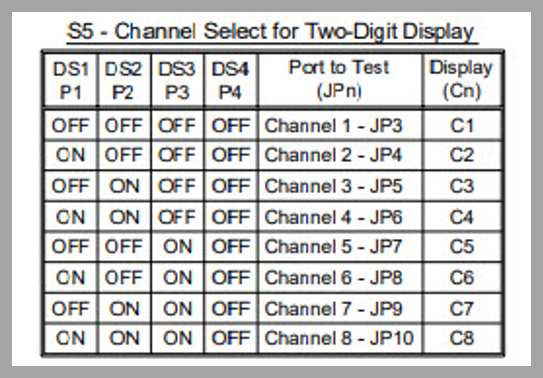
-
Read the two-digit display. It shows Cn (n = channel number) and then alternates:
- D1 and OK: the connection is good.
- D1 and –: go to step 4.
- D1 and a number: contact CE support.
-
Unplug the connector from that channel’s jack (JPn). Swap RX+ with TX+ and RX- with TX-, then plug it back in and read the display again.
- D1 and OK: the connection is now good.
- Still D1 and –, or D1 and a number: contact CE support.
-
When you are finished, set S1 DIP switch 1 back to OFF.
Verify with CE support.
Still have a question? Ask Elevate AI