
Elite PI Designer and Transfer how-to guides
These guides cover everyday tasks in Elite PI Designer and Elite PI Transfer, with screenshots. For changing pictures and videos, choosing a USB stick and fixing common update errors, see Updating Elite PI content with Designer, Transfer and USB.
How do I make a USB installer in Elite PI Designer and load it onto a screen?
In Designer choose File → Make USB Installer, save the file as USBInstaller.zip on an empty USB stick, and plug the stick into the screen. The screen installs the design by itself and tells you when to remove the stick.
Watch the USB installer video tutorial.
-
Open your design in Elite PI Designer and save it first (File → Save), so your changes are kept.
-
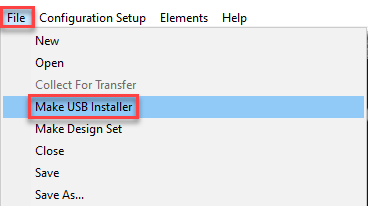
Click File, then Make USB Installer.
-
Choose where to save the file. Saving it straight to the USB stick is easiest. The file must be named exactly
USBInstaller.zip. If it has any other name, the screen will not update.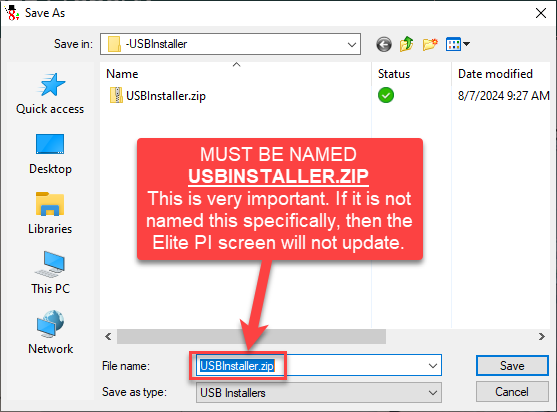
- Do not open or unzip the file. It is password protected and is only for the screen.
- Put only this one file on the stick, in the main folder (not inside another folder). Never put two installer files on the same stick.
- For which USB stick to use, see What USB stick should I use?
-
Plug the stick into the USB port on the back of the Elite PI screen. If your screen has a CE USB extension cable, use the USB port in the service panel inside the car operating panel instead.
-
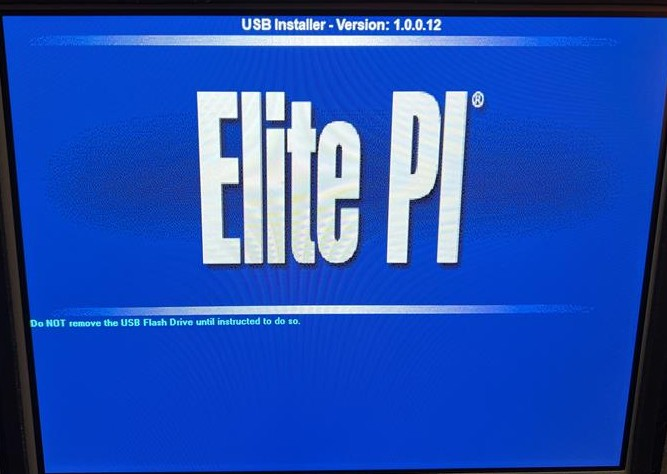
The screen shows a blue USB Installer screen and a series of messages. Do not remove the stick until the screen tells you to.
-
Remove the stick when told. The screen restarts and shows your updated design.
A USB stick updates only the screen it is plugged into. Repeat these steps at every screen, or use Elite PI Transfer to update all screens over the network.
How do I get the design off an Elite PI PRO screen when I no longer have the file?
Use CE’s design puller: copy it to a USB stick as USBInstaller.zip and plug the stick into the Elite PI PRO screen. The screen copies the design it is running onto the stick, and you can then open that design in Elite PI Designer.
-
Download the USBInstaller design puller. Do not unzip it.
-
Use a USB stick of 64 GB or smaller. A 16 GB or smaller stick formatted FAT32 is the safest choice. Insert it into your PC, right-click the drive in File Explorer and select Format to erase it.
-
Copy the downloaded file onto the empty stick.
-
Rename the file on the stick to exactly
USBInstaller.zip. If it has any other name, the screen will not do anything when you plug the stick in. To see the full name, turn on file name extensions in File Explorer: select View → Show → File name extensions. The file must show as USBInstaller.zip.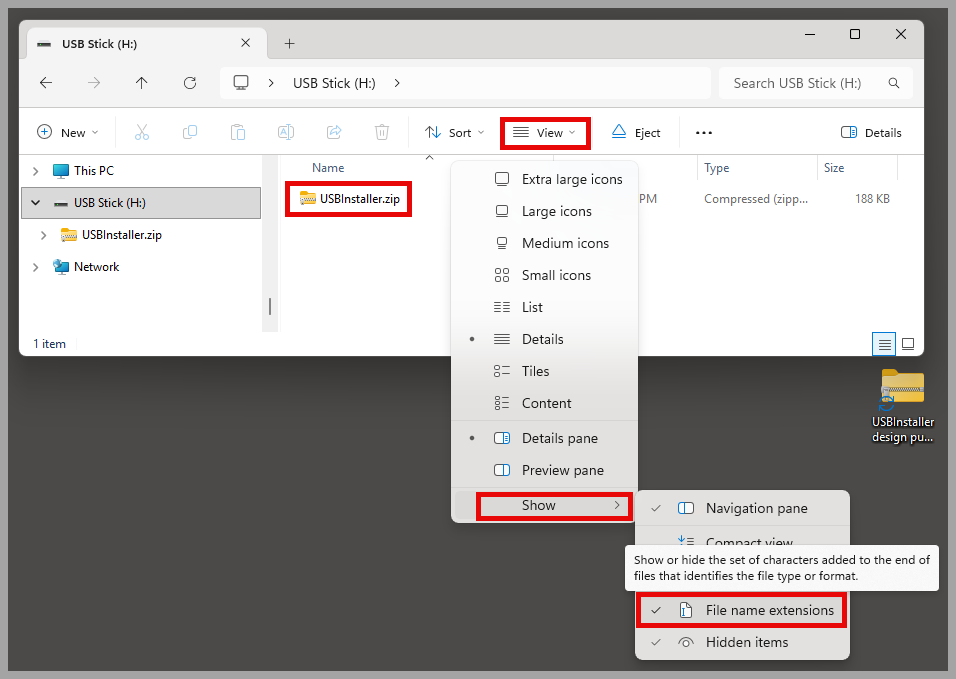
-
Right-click the USB drive and select Eject, then remove the stick.
-
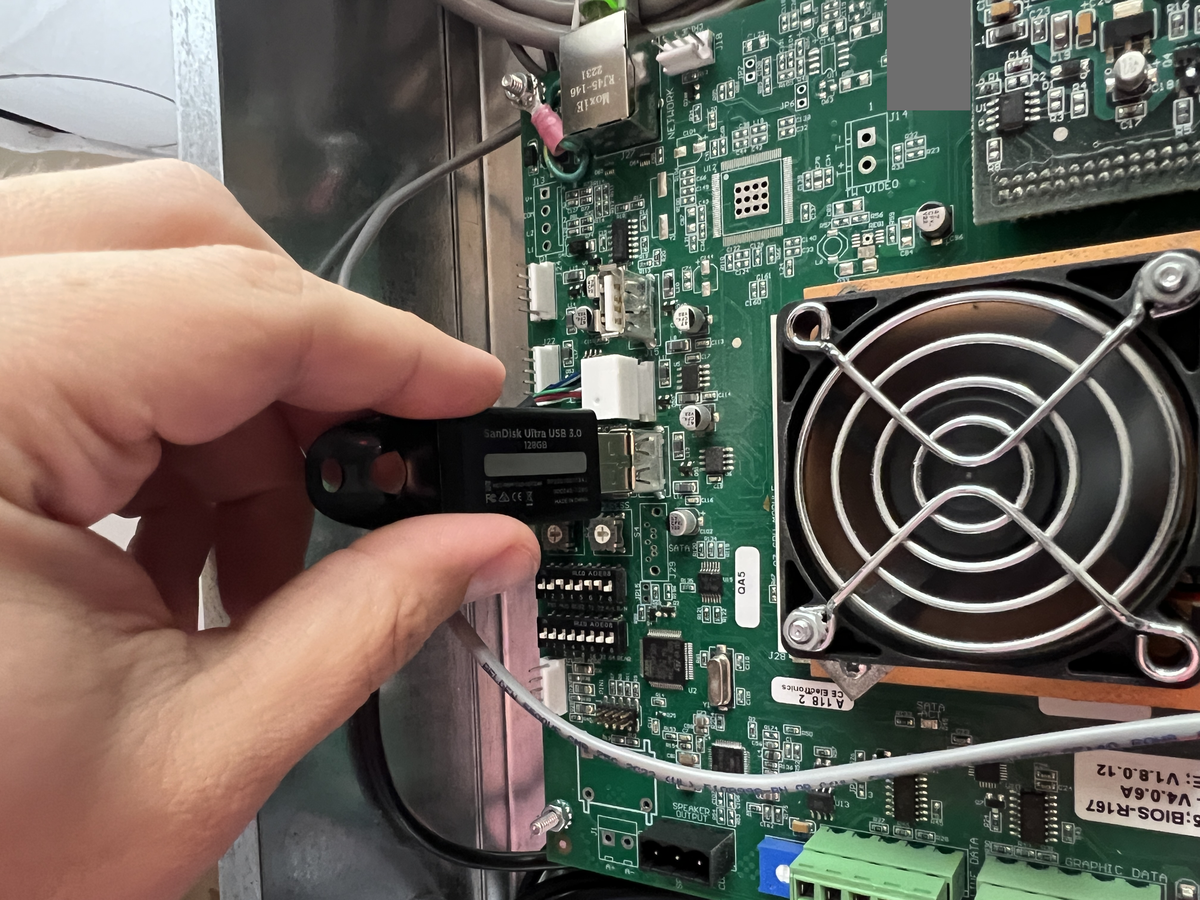
Plug the stick into either of the two USB ports on the Elite PI PRO computing unit. It is usually on the back of the screen. Where space is tight, the unit may be mounted elsewhere, for example on top of the car.
-
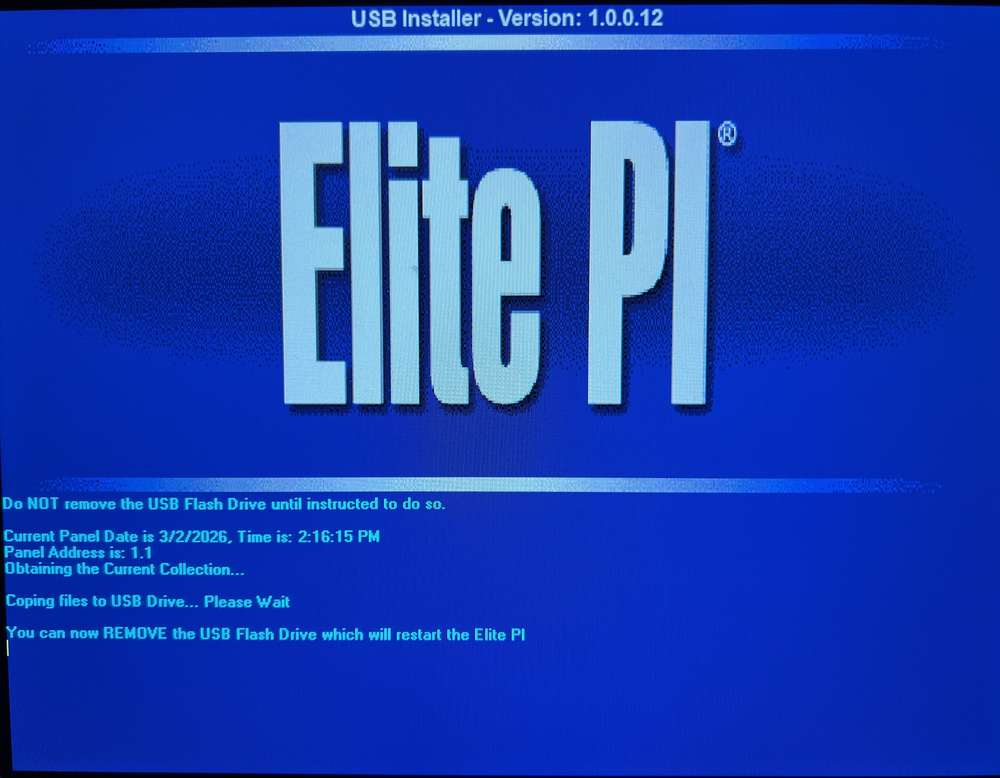
The screen shows a blue USB Installer screen while it works. When it is done, it shows “You can now REMOVE the USB Flash Drive”. Remove the stick then.
-
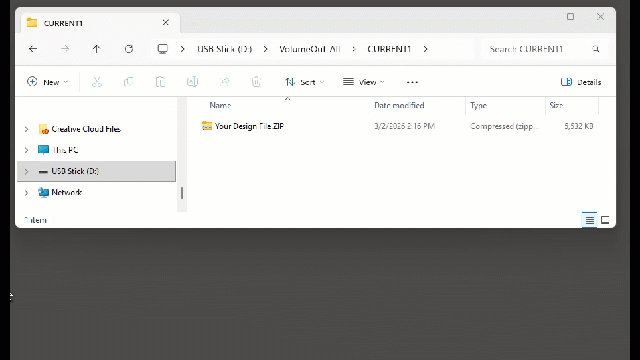
Plug the stick into your PC and open it. Open the VolumeOut-All folder, then CURRENT1 or CURRENT2. Inside is your design as a .zip file. Copy it to your PC.
-
Open that design zip in Elite PI Designer to edit it. See How do I open an Elite PI design in Designer?
If the screen shows “No Zip file found. Nothing to execute.”:
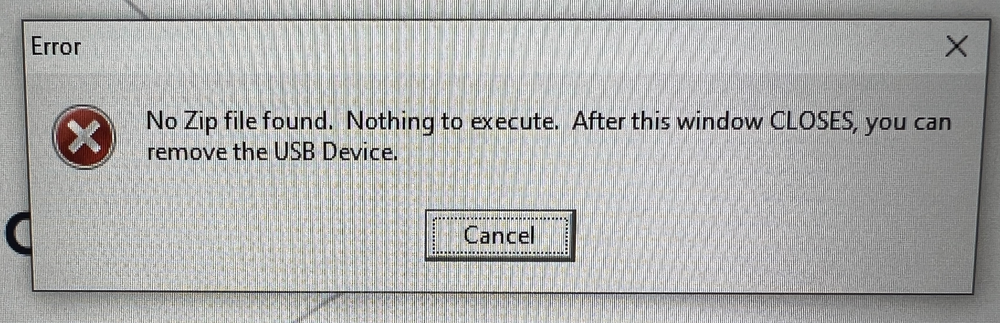
- Check that the file on the stick is named exactly
USBInstaller.zip. - Turn the screen’s power off, count to 10, and turn it back on. Then try again.
- Try a different USB stick of 64 GB or smaller.
Video tutorials: using Elite PI Designer and sending a design to the screens with Elite PI Transfer.
How do I remove the time and date from a design?
Open the design in Elite PI Designer, switch to edit mode, right-click each time and date area and select Delete, then save and send the design to the screens.
The time and date can drift when a screen has no permanent network connection to a PC that sends it time updates. If your property cannot keep that connection, removing the time and date from the design is the simplest fix. If you have the connection but the time update fails, see Why does the time update fail with “insufficient system resources”?
-
Open your design in Elite PI Designer.
-
Switch to edit mode: click the edit (layout state) button so it is highlighted blue. The lock button next to it must not be highlighted, so the design is unlocked. In edit mode, the design elements have dashed lines around them.

-
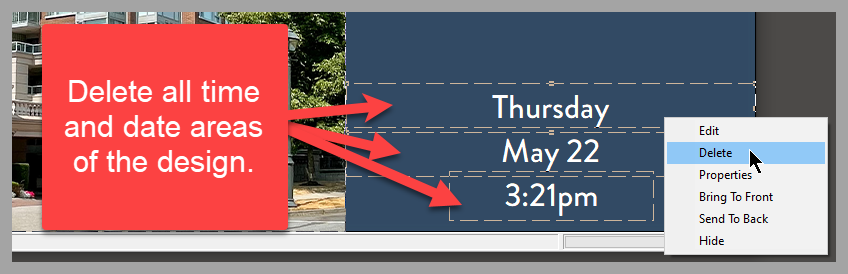
Right-click the time and date area and select Delete. When asked “Delete this item?”, click OK. If the design has more than one time or date area, delete each one. Do not delete anything else.
-
Save the design (File → Save or File → Save As).
-
Send it to the screens: make a USB installer (see How do I make a USB installer?) or use Elite PI Transfer (see How do I change the pictures or video on my Elite PI screens?).
How do I keep a floor message on the screen until the car leaves the floor?
Turn on Ignore Door Signal in the message window’s properties. The floor message then stays on the screen until the car leaves that floor, instead of disappearing shortly after the car arrives.
-
Open your design in Elite PI Designer.
-
Switch to edit mode by clicking the layout state button. The design elements now have dashed lines around them.
-
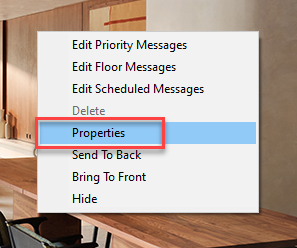
Right-click inside the message window and select Properties.
-
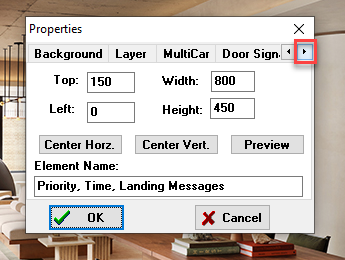
Click the right arrow at the top of the Properties window until the Door Signal tab appears, and open it.
-
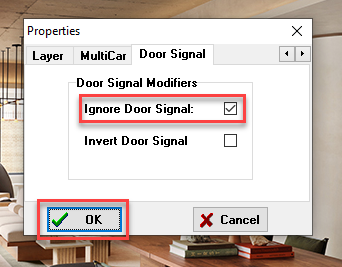
Check Ignore Door Signal and click OK.
-
Save the design and send it to the screens with Elite PI Transfer or a USB installer. The change takes effect once the screens have the new design.
How do I update Elite PI screen firmware with Elite PI Transfer?
Create a Code Update task in Elite PI Transfer, browse to the .eep firmware file CE sent you, select the screens and click Create and Run. A screen turns green when its update has been sent.
Before you start, Elite PI Transfer must be installed and already set up to communicate with the screens on your property. If it is not, see ENET router setup with WinBox and Elite PI Transfer or contact CE support. Only use an .eep file that CE sent you for your screens.
-
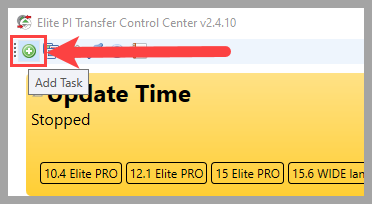
Open Elite PI Transfer and click the Add Task button (top left).
-
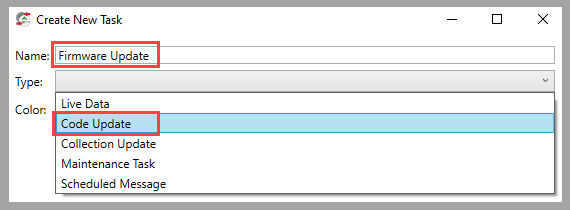
Name the task, for example “Firmware Update”, and select Code Update as the Type.
-
Click Browse and select the
.eepfile from CE. Then click Displays.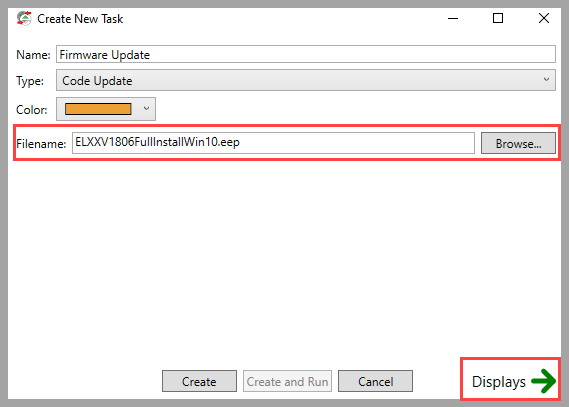
-
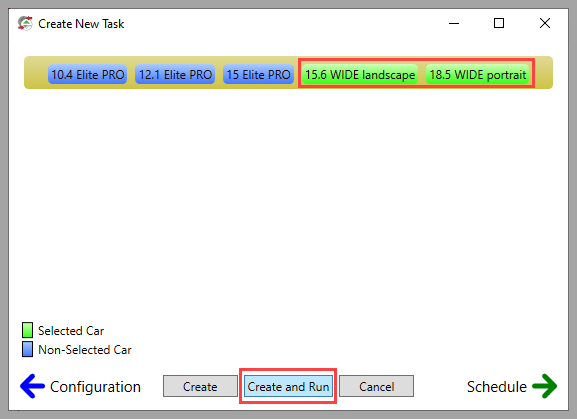
Click each screen that should get the update so it turns green (selected), then click Create and Run.
-
The new task appears on the main Transfer page. Screens that turn green were updated. If a screen turns red, Transfer could not reach it, which usually means a communication or network problem. Contact CE support. See also What do the yellow, green and red colors in Elite PI Transfer mean?
Still have a question? Ask Elevate AI