
Updating Elite PI content with Designer, Transfer and USB
Elite PI screens show a CE-built template (position indicator, logo, banner, priority messages) plus the scheduled messages (flyers, photos, video) that the building changes itself. You edit the scheduled content in Elite PI Designer, then send it to the screens either over the local network with Elite PI Transfer or by plugging a USB stick into each screen. This topic covers that workflow and the errors that come up most often.
How do I open an Elite PI design in Designer?
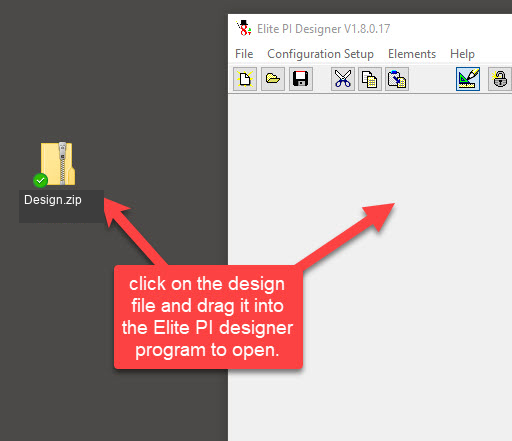
Open the design zip file from inside Elite PI Designer; do not double-click the zip file.
-
Drag the design zip onto the large white area in Designer.
-
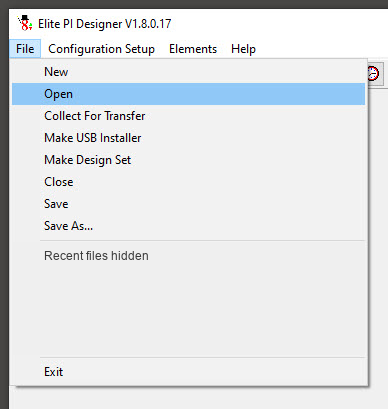
Or select File → Open in Designer and browse to the design zip file.
How do I change the pictures or video on my Elite PI screens?
Open your CE template in Elite PI Designer, replace the scheduled messages, save, and then send the result with Transfer or a USB installer. Do not try to load a picture or video file onto the screen by itself – the screen only accepts a design made from your template.
- Start Elite PI Designer and open the template zip file CE sent you (you can drag it onto the large white area). The file name usually contains your job number and a “D” number, which is simply the date it was saved.
- Right-click the large message window and choose Edit Scheduled Messages.
- Pick a blank message slot, click the camera/insert image icon, browse to your image or video, and click Open.
- Click Set as valid. This fills in the schedule table so the screen knows when to show the slide. Duration is in seconds (it defaults to 15; 5 for some message types). You can also limit a slide to up or down travel, certain weekdays, or a start/end time and date – useful for things like lunch specials. Leave the defaults to show it all day.
- To remove a slide, click in its text box, press Ctrl+A, press Delete, then click Clear period so the screen does not keep showing a blank slide.
- Click the green check mark to close the editor.
- Preview with the layout state / test mode button (the protractor-and-pencil icon on the top bar): left/right arrows cycle through your messages, up/down arrows change floors, and Page Up/Page Down show the priority messages.
- File → Save As, save type Collection. Change the “D” number to today’s date so you can keep several versions, and keep each version in its own folder so you can go back to a known-good design.
- Send it to the screens:
- Network (Transfer): open Elite PI Transfer, add or edit a task (type Collection update), browse to the collection zip you just saved – not the raw image or video – pick the displays, then Create and run / Save and run.
- USB: in Designer choose File → Make USB Installer, save it (the name must be exactly
USBInstaller.zip), copy that file unchanged to a FAT32 USB stick, and plug the stick into the USB port on the back of each screen. The screen updates by itself and tells you when to remove the stick; no reboot is needed. Step-by-step screenshots: How do I make a USB installer in Elite PI Designer?
If only one slide is active, the screen does not rotate – a single video simply loops.
What is the difference between scheduled, floor and priority messages?
- Scheduled messages rotate while the car travels (flyers, photos, video) and are what the building edits.
- Floor messages (right-click → Edit Floor Messages) are tied to one floor in your floor list and appear only when the car stops at that floor and the doors open – for example “Caution – construction on 4”.
- Priority messages (PM1, PM2, …) are the code-required messages (fire service, overload, etc.) triggered by the elevator controller. What each one says depends on the controller. Do not delete them; see the priority-message question below.
What size do my images need to be, and why does Designer reject them or show black bars?
Images must match the pixel size of the scheduled-message window in your template – for the common template that is 1024 × 576 pixels, landscape. Right-click the large window in Designer and choose Properties to see the exact dimensions for your template (one older template measured 1032 × 584).
- Designer refuses an image that is too big or the wrong size. If you crop or pad a differently shaped picture to 1024 × 576 it will load, but a portrait flyer ends up with black (or white) bars on the sides.
- Best results: build the flyer at 1024 × 576 in your graphics tool (Canva, Photoshop, Illustrator, or a free online resizer), move the elements around to suit a horizontal layout, and export at about 72 PPI – do not exceed 100 PPI.
- For video, use WMV at 1024 × 576.
- Keep the file names simple – see the special-characters question below.
What USB stick should I use, and why does the screen say “no file found” or “no zip file located”?
Use a small FAT32 stick with nothing on it but the unchanged installer file. A large exFAT stick (for example 57.6 GB) returns “no file found”; the same update loads from a 16 GB FAT32 stick.
Check in this order:
- Size and format – 16 GB or smaller, formatted FAT32 (right-click the drive → Properties → File system / Capacity). High-density sticks do not load properly. Sticks under 64 GB may work, but 16 GB or smaller is the safe choice.
- Only one file – the installer must be the only file, in the root of the stick, not inside a folder.
- Exact file name – the screen looks only for
USBInstaller.zip(no space). Make sure Windows did not add “(1)” or other characters when you downloaded it; if it did, rename the file back to exactlyUSBInstaller.zip. If you cannot see the.zipending, Windows is just hiding file extensions – that is normal. - Do not unzip or open it – the installer is a password-protected zip. Opening or extracting it breaks it. Copy the whole file as-is.
- Re-download if in doubt – a damaged download can give “no zip file located” even though the name looks right. Ask CE to re-send the file and copy it straight to the stick.
- If a screen shows “Please load valid graphics”, “CRC error” or “no valid design” after a power-up, it has no design in flash; ask CE support for the USB installer for that unit (have the serial number from the label handy). On an EMN104-ACH, turning on DIP switches 1 and 2 of bank S1 shows a device-information screen; turn them off again afterwards.
If the stick is right and the screen still fails at “transferring to internal memory”, the unit may need to go back to CE for bench testing. Renaming the installer to end in the serial number of the target screen should not make a difference. Verify with CE support.
Why does Transfer say “the collection does not have a CLT file”?
Transfer is being given a plain video or image instead of a collection. Only a collection zip saved from Elite PI Designer contains the CLT file that Transfer needs.
- In Designer, open your template zip, not the video.
- Right-click → Edit Scheduled Messages, delete the slides you no longer want (and Clear period on each), add the video with the camera icon, click Set as valid, then the green check mark.
- File → Save As, type Collection. Any name is fine; keeping the job number in it helps CE if something goes wrong later.
- In Transfer, edit or create the graphics task, browse to that collection zip, and Save and run. The display row turns yellow while it works and green when done.
Note that Make USB Installer is only for USB updates; Transfer always wants the collection zip.
Why does the USB update say “complete” but the screen still shows last month’s content?
Almost always a special character in a file name. The screen reads the whole stick and reports “complete”, but the message with the bad file name is silently skipped, so the old slides stay.
The Designer/Transfer software treats characters such as parentheses ( ), brackets [ ], dashes -, colons :, commas ,, asterisks *, semicolons ; and apostrophes ‘ in image or video names as commands. Designer will save the design without complaint; the failure only shows at upload time – on USB as unchanged content, in Transfer as red bars / “upload failed”.
- Rename every photo and video so the names contain only letters, numbers and spaces.
- Re-insert the renamed files in Edit Scheduled Messages (the old slide still points at the old name), Set as valid, save.
- Make a fresh USB installer or collection and send it again.
- If Windows cannot format or write the stick (“you need permission to perform this action”), the stick or the PC’s security policy is the problem – use a different, freshly formatted stick.
Renaming the files resolves this.
What do the yellow, green and red colors in Elite PI Transfer mean?
| Color / status | Meaning | What to do |
|---|---|---|
| Yellow, “trying to connect to display” | Upload in progress or still connecting | Wait. On older Moxa (serial) systems a few megabytes can take a long time – the status is normal. |
| Green | Task finished | Check the screen itself. A task that was stopped also turns green, which does not mean content was delivered. |
| Red | Error – commonly a file name with special characters, or a display that cannot be reached | Fix the file names (see above) or check that the display is powered and connected. |
| Very long “time remaining” on one car | That display is not responding or is very slow | Check that the car is in service and reachable; a very long estimate (for example 173 minutes) on one car while the others are done points to a connection problem. |
Tips:
- Do not open Edit Displays (the second icon, top left) while a task is running; Transfer throws an error. Let the transfer finish first.
- If Transfer “has stopped working”, close it (Task Manager if needed) and reopen it; the task can then be resumed.
- Newer Transfer builds are on the CE website (version 10 replaced version 9); the user interface is unchanged.
- Uploads are much faster on CE’s E-Net (network) hardware than on the older Moxa serial modules. Changing from Moxa to E-Net is a hardware change arranged through your elevator contractor and CE sales.
Does a USB update in one car update all the screens in the bank?
No. A USB stick updates only the screen it is plugged into; you must repeat it at every display, which is why cars end up showing different content. To update all screens at once, use Elite PI Transfer on the PC that is networked to the machine-room equipment.
- Firmware (code) updates that CE sends as an
.eepfile can be sent to the screens over the network with an Elite PI Transfer Code Update task – see How do I update Elite PI screen firmware with Elite PI Transfer? Other software installers (for example one that re-sizes the picture after a screen replacement) are done at each screen individually with a USB installer. - If there is no CE USB extension cable, someone must open the car operating panel to reach the USB port on the back of the screen – that is the elevator contractor’s job. A CE USB extension cable, installed by the elevator contractor, brings the port down to the fire-service or security lock box so building staff can update with a key. CE does not recommend improvising with a store-bought cable; an inspector may write up loose wiring.
- Remote updates work only when the PC running Designer/Transfer is on the same local network as the machine-room equipment (or your IT department bridges the networks with a VPN). The software cannot be reached from the internet.
Why did my priority or emergency messages disappear after a content update?
Because the design being uploaded no longer contains them. Every upload replaces the whole design on the screen, so if the communications team is working from a copy of the design that has no priority messages, each daily upload wipes them out again – even though nobody “touched” them.
- In Designer, open the design you upload from and go to Scheduled → Edit Priority Messages. Step through messages 1 to 8 (or however many your controller uses). If they are blank, this is the cause.
- Have CE put the priority messages back into your current design, or copy them in from the design folder (the images are listed as PM1, PM2, …), then verify them in test mode with Page Up/Page Down.
- From then on use only that design as the starting point for every update. Move or delete older designs so nobody picks one up by mistake.
- After the next upload, have the elevator contractor trigger a priority input and check that the message shows. Building security can repeat this test after big content changes.
This is the usual cause of an emergency message (for example an active-shooter message) going missing after updates. If a priority message appears cut off or off-center, CE corrects the template in the design file, which is then installed by USB.
Why do my screens show the white template with no content, or revert to an older design?
There are two different causes:
- White template, no slides, no position indicator: the content in the design is most likely hidden or not marked valid. Check each scheduled message has an image, is Set as valid, and that the layout preview shows it; then re-send the collection. Verify with CE support.
- Changes revert hours or days later on some cars: someone else is uploading. A typical case: another user sends an older design from Transfer to the same screens that were just updated, and because all the displays in Transfer are labeled “left”, the wrong ones get picked. Label the displays in Transfer: turn on DIP switch S11 on the display to bring up its information screen with the MAC address, match that MAC address in Transfer, and name the display (e.g. main / auxiliary). Then make sure everyone uploads the same current design.
Also remember that a successful upload to a display that is not actually connected or powered changes nothing on the car – if Transfer shows a car but the screen never changes, have the contractor check the display’s connection.
Can I change the template, logo or background myself, and how do I get the default graphics back?
Building staff can change only the scheduled-message area. The template itself – position indicator box, logo, banner, rounded or square corners, priority message text (including translations) – is built by CE’s graphics department so the emergency-message layering stays correct. Send the logo or artwork to CE (through your sales contact or support) and CE returns a new template/design file for you to load.
- The factory default is a plain blue background with a white position indicator. If a screen shows that, somebody loaded a design without the custom background.
- To restore a previous design (for example a “welcome” background or a plain gray background with the white number), ask CE support for that job’s design as a
USBInstaller.zipand load it by USB as described above – do not unzip it. - To get a copy of the design a screen is running, use CE’s design puller (also called a USB extractor): it is a
USBInstaller.ziptoo; plug it into the screen, wait until it says you can remove the stick, and it writes a zip of the design currently running on that screen into a folder on the stick. You can open that zip in Designer, or email it to CE so graphics can edit it and send back a new installer. See How do I get the design off an Elite PI PRO screen? - Designs made for one unit (for example an EMN43B1V) can be matched to older units by CE from the serial numbers on the back labels.
Why does the time update fail with “insufficient system resources”?
On the older Moxa-based Elite PI systems this message appears when the host PC can no longer talk to the machine-room boards after they have been repaired and reinstalled; the connection in the Elite PI software has to be reconfigured for the new module.
- Check that the machine-room boards have power and a network link.
- Set all DIP switches OFF on the machine-room boards; only the baud rate has to match the car-station switches – the other switches do something different and must not be copied from the COP.
- Have CE support remote into the host PC to reconfigure the connection to each riser’s module (the original IP addresses are in CE’s job notes).
- Then retry the time update.
Verify with CE support.
Still have a question? Ask Elevate AI